Citizen science · Technical build
How to Build a Private AirGradient-to-Analytics Pipeline
An Android controller, custom ESP32-C3 firmware and one direct, authenticated path from an open monitor to Omniscope.
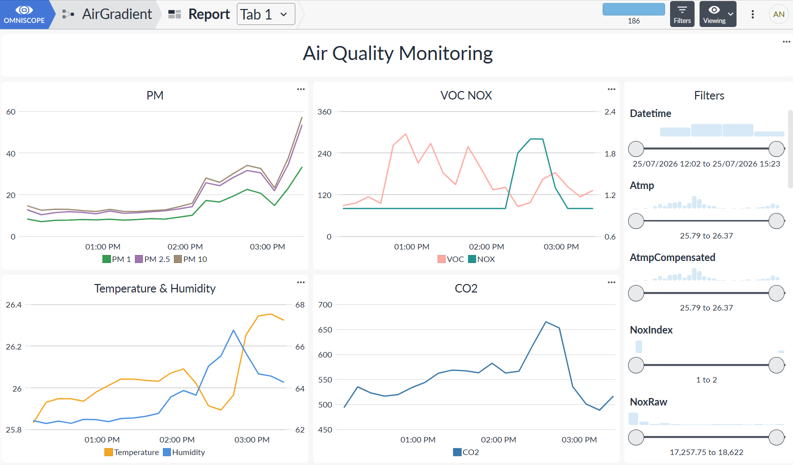
I bought an AirGradient ONE to monitor the air in my room.
Naturally, this became an Android application, a fork of its ESP32-C3 firmware, a browser-based USB installer and a private data pipeline into Omniscope.
The finished system sends a measurement from the monitor directly to an Omniscope workflow once per minute:
AirGradient ONE
      |
      | HTTPS + Basic authentication
      | one outbound request every 60 seconds
      v
Omniscope Workflow API
      |
      +--> parse JSON
      +--> add server-side UTC timestamp
      +--> append to history
      +--> feed an interactive report
There is no AirGradient cloud in the data path, no Raspberry Pi polling the device, no inbound router port, no MQTT broker and no separate Python receiver. This article explains how I built that complete path.
The hardware
My monitor is an AirGradient ONE I-9PSL. It measures CO₂, PM₁, PM₂.₅ and PM₁₀, TVOC and NOₓ indices, temperature and relative humidity.
The device uses an ESP32-C3 microcontroller with Wi-Fi and 4 MB of flash. AirGradient publishes its firmware and hardware materials and explicitly supports connecting the device to other data platforms. That gave me access to the code and hardware details I needed to change where the measurements went.
The stock firmware also exposes a useful
local-server API.
GET /measures/current returns the current measurement JSON, GET /config
returns the device configuration, PUT /config applies changes and /metrics
provides a metrics representation.
The API can be reached on the same network using:
http://airgradient_SERIAL.local
or the monitor’s numeric private IP address.
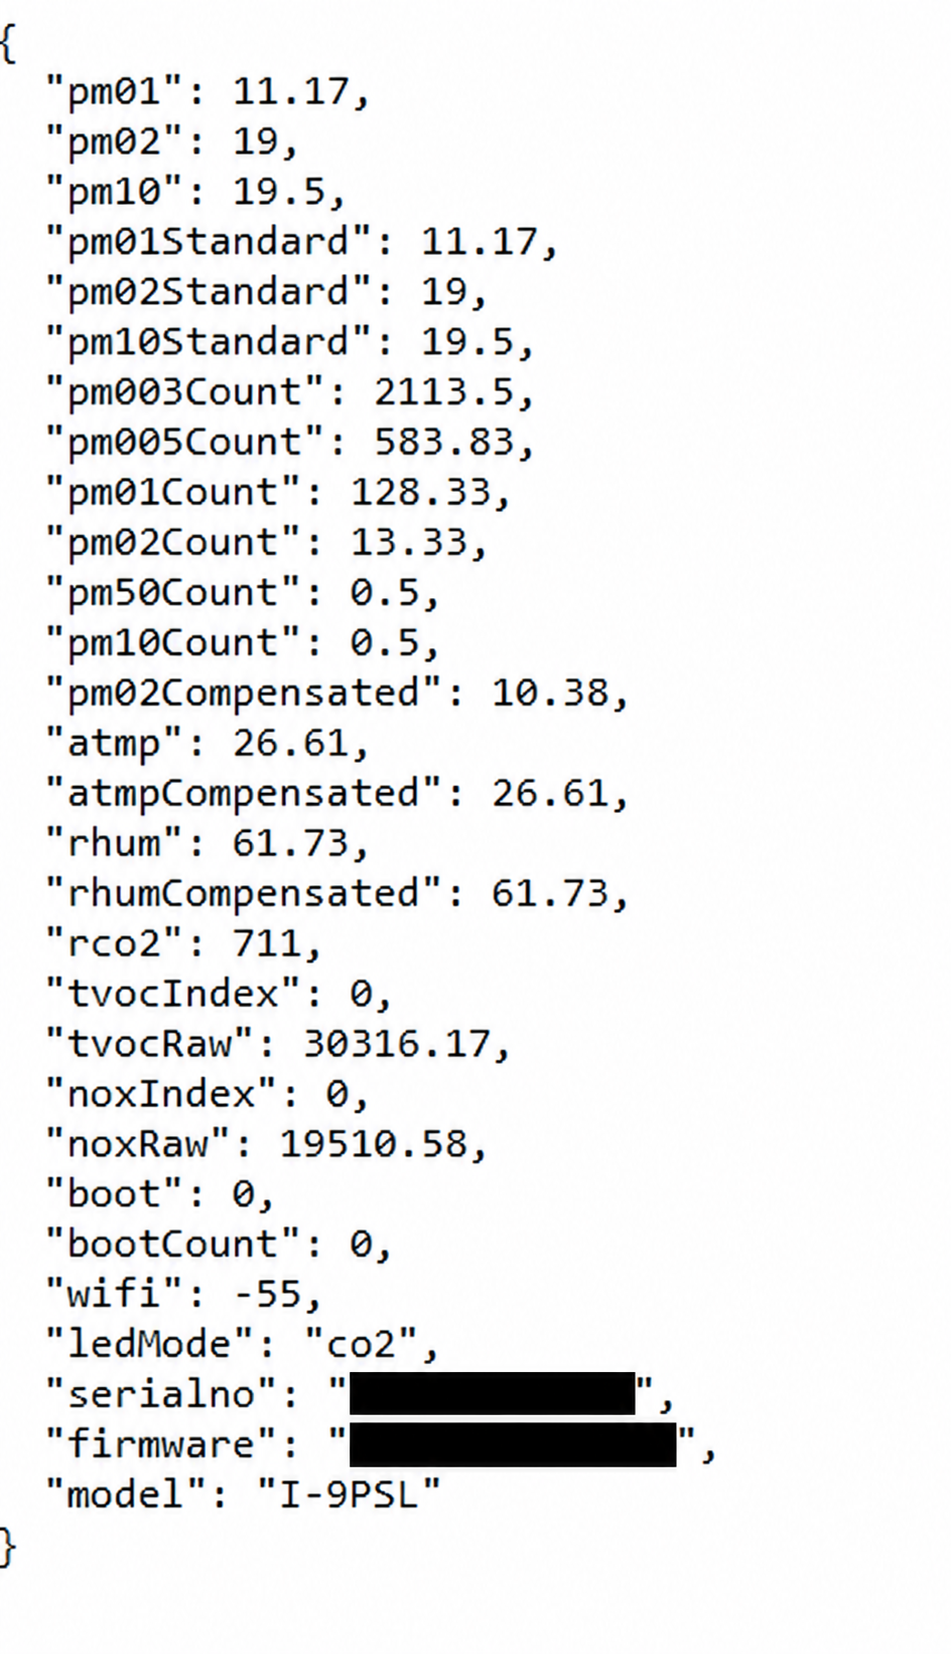
A real /measures/current payload from the I-9PSL. The device serial number
and obsolete pre-fix firmware version are deliberately blacked out.
The constraints
I considered the usual options: the AirGradient cloud, a computer polling
/measures/current, an inbound router port, MQTT, a small HTTP receiver or a
Python process to parse and append each message. Any of them could work, but
each introduced a service or machine I did not want to operate for one monitor
in one room.
I wanted the measurement history outside the vendor cloud, with no always-on collector in my home, no inbound router access and no phone process running in the background. The destination had to be configurable, and the monitor had to send its data over an authenticated, encrypted connection directly into the environment that would process and visualise it.
The monitor already possessed the data, network connection and processor. Making something else poll it would add a dependency, so I made the monitor push.
Component one: the Android controller
The local API could be used from a browser or command-line client, but I wanted a convenient control surface that lived on my phone.
I created AirGradient Omniscope for Android.
The app connects through a .local hostname or private LAN IP, displays the
current measurements and can refresh them every five seconds. It reads and
edits /config, saves changes with PUT /config, configures the complete
Omniscope integration and includes an advanced JSON editor. It remembers the
monitor address locally and follows Android’s dark or light theme.
It deliberately does not collect measurements in the background. Its responsibility is local control, not historical ingestion.
A restricted native bridge
The interface is a small application bundled inside the APK. JavaScript calls a native Java bridge to perform local HTTP requests, avoiding browser CORS restrictions.
A JavaScript bridge is privileged, so the native layer is intentionally narrow:
- only bundled HTML can load in the WebView;
- external websites are rejected;
- file and content access are disabled;
- requests must target
.local, loopback, link-local or private LAN addresses; - only
GETandPUTare accepted; - requests are restricted to
/config,/measures/currentand/metrics; PUTis accepted only for/config;- redirects are disabled;
- response sizes are bounded.
AirGradient serves its local API over ordinary HTTP rather than HTTPS. The Android network-security configuration therefore permits cleartext traffic, but the native address policy prevents that permission from becoming a general-purpose route to public hosts.
The app has no account, advertising, analytics SDK, cloud API or third-party runtime library.
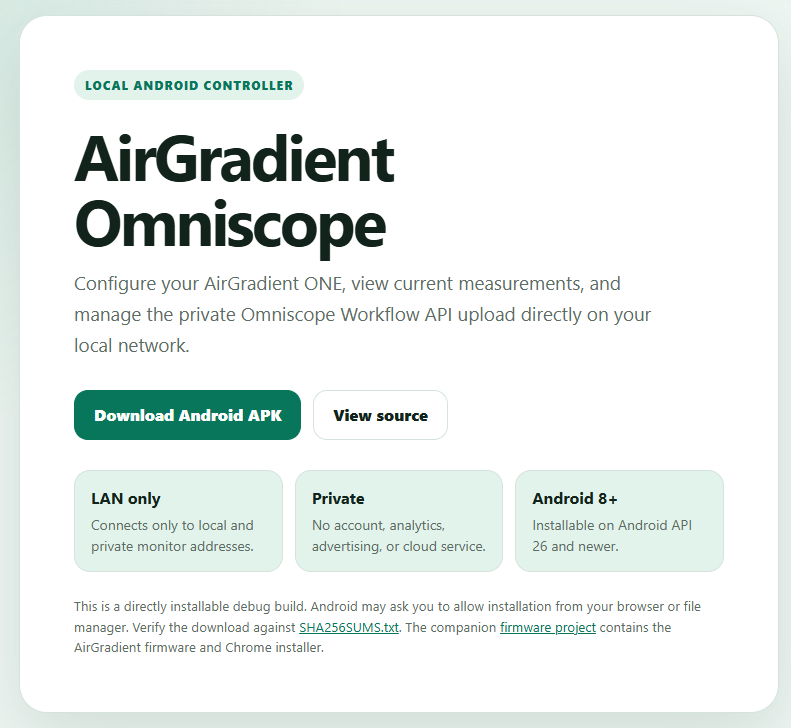
The companion Android controller is distributed as a directly installable APK with its source and checksum. It operates only on the local network and uses no account, analytics or cloud service.
Component two: the customised firmware
I forked the official AirGradient Arduino repository at firmware release 3.3.9 and created airgradient-omniscope.
The build targets the ESP32-C3 used by the I-9PSL. The current tested release is:
3.3.9-omniscope.2
The firmware adds six configuration properties:
{
  "omniscopeWorkflowEnabled": true,
  "omniscopeWorkflowEndpoint": "https://HOST/PATH/PROJECT.iox/w/execute",
  "omniscopeWorkflowBlock": "Store AirGradient Measurement",
  "omniscopeWorkflowParameter": "measurementJson",
  "omniscopeWorkflowUsername": "DEVICE_USER",
  "omniscopeWorkflowPassword": "DEVICE_PASSWORD"
}
These fields can be updated through the Android interface or directly through
PUT /config.
The complete endpoint is configurable, not merely the host. The workflow block
and parameter name are configurable too. Moving the Omniscope project,
renaming the receiving block or changing the parameter does not require
another firmware build within the current certificate trust boundary. This
release embeds the Sectigo E46 trust anchor used by *.omniscope.me; moving to
a host whose certificate chains to another root requires a firmware and
trust-anchor change.
The same configuration can enable or disable the integration without reflashing.
Keeping the AirGradient cloud disabled
For the private data path, the relevant configuration is:
{
  "offlineMode": false,
  "postDataToAirGradient": false,
  "disableCloudConnection": true,
  "omniscopeWorkflowEnabled": true
}
offlineMode remains false because the networking task must run. The
AirGradient measurement and configuration cloud calls can remain disabled
while the separate Omniscope schedule continues.
This distinction matters: private operation still needs internet connectivity for the outbound request, but it does not require the manufacturer’s data service.
Component three: the direct Workflow API request
Omniscope exposes a
Workflow REST API.
A POST to a project’s /w/execute endpoint can set parameters and execute
named workflow blocks.
Workflow API execution is disabled by default. The receiving project and dedicated device account must be granted only the execution permission this integration requires.
Once every 60 seconds, the firmware:
- confirms that Wi-Fi is connected;
- confirms that the integration is enabled and configured;
- obtains the current AirGradient measurement;
- serialises it as JSON;
- places that JSON inside the configured string parameter;
- sends the authenticated HTTPS request;
- records the HTTP result in the serial log.
The request body is:
{
  "blocks": ["Store AirGradient Measurement"],
  "refreshFromSource": true,
  "cancelExisting": false,
  "waitForIdle": true,
  "params": {
    "updates": [
      {
        "name": "measurementJson",
        "value": "{\"wifi\":-55,\"rco2\":620,\"pm02\":4,...}"
      }
    ],
    "waitForIdle": true
  }
}
The nested JSON looks unusual at first. The AirGradient object is sent as the value of a string parameter, so its quotation marks are escaped in the outer request.
This creates a clean ingestion contract: one workflow parameter contains the complete payload produced by the device.
This workflow requires refreshFromSource to be set to true.
Authentication, TLS and secrets
The device authenticates with HTTP Basic authentication over HTTPS.
Basic authentication is acceptable here only because it is protected by TLS.
The endpoint must use https://; the firmware rejects ordinary HTTP
destinations.
The connection and response timeouts are both 15 seconds. Any HTTP 2xx
response is treated as success; other responses and transport failures are
logged.
The firmware contains the Sectigo E46 public trust anchor needed to validate
the current *.omniscope.me certificate chain. It does not contain the
wildcard certificate, its private key or any private server material. A host
that chains to another root needs a firmware change.
The private key remains on the Omniscope server. An unattended device must retain the Basic-auth password locally, however, and ESP32 flash should not be mistaken for a hardware security module, so this needs a proportionate security model:
- use a dedicated Omniscope account;
- grant only the project permissions required for ingestion;
- do not reuse a personal or administrative password;
- rotate the credential if the device is lost or transferred.
The firmware also prevents accidental credential disclosure through the local
API. GET /config returns:
{
  "omniscopeWorkflowPassword": "********",
  "omniscopeWorkflowPasswordSet": true
}
The real password is never returned. Sending ******** back during an
unrelated configuration change preserves the existing password rather than
replacing it with eight asterisks.
Component four: the Omniscope receiving workflow
The Workflow API is not just a trigger for a finished dashboard. It is the ingestion boundary for the complete server-side data process.
The receiving workflow:
- accepts the configured string parameter;
- parses the measurement JSON;
- converts values into typed fields;
- adds a server-side UTC receipt timestamp;
- appends the row to historical storage;
- organises and labels the analytical fields;
- feeds an Omniscope Report block.
Adding time on the server gives every accepted measurement a consistent UTC reference independent of the device clock.
I retained the complete payload, including fields the first report did not yet use. Questions change, and I did not want a new analytical question to require another redesign of the device request.
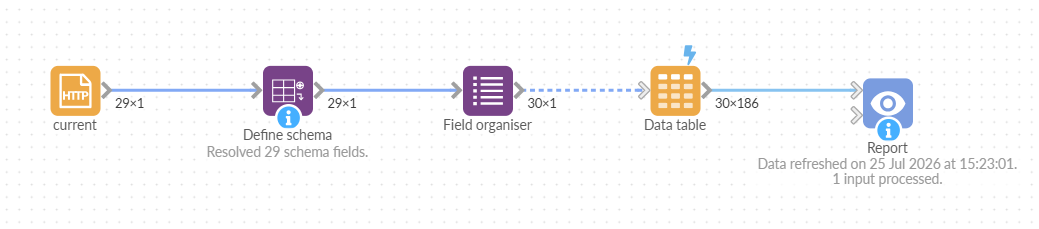
The receiving workflow. The complete device payload enters through HTTP, passes through schema and field organisation, is appended to the historical table and feeds the Report block.
The report exposes current and historical CO₂, PM₁, PM₂.₅ and PM₁₀, VOC and NOₓ indices, temperature, humidity, Wi-Fi strength and device metadata. From the same history I can filter time, compare measures, look for repeated daily or weekly patterns and inspect individual events.
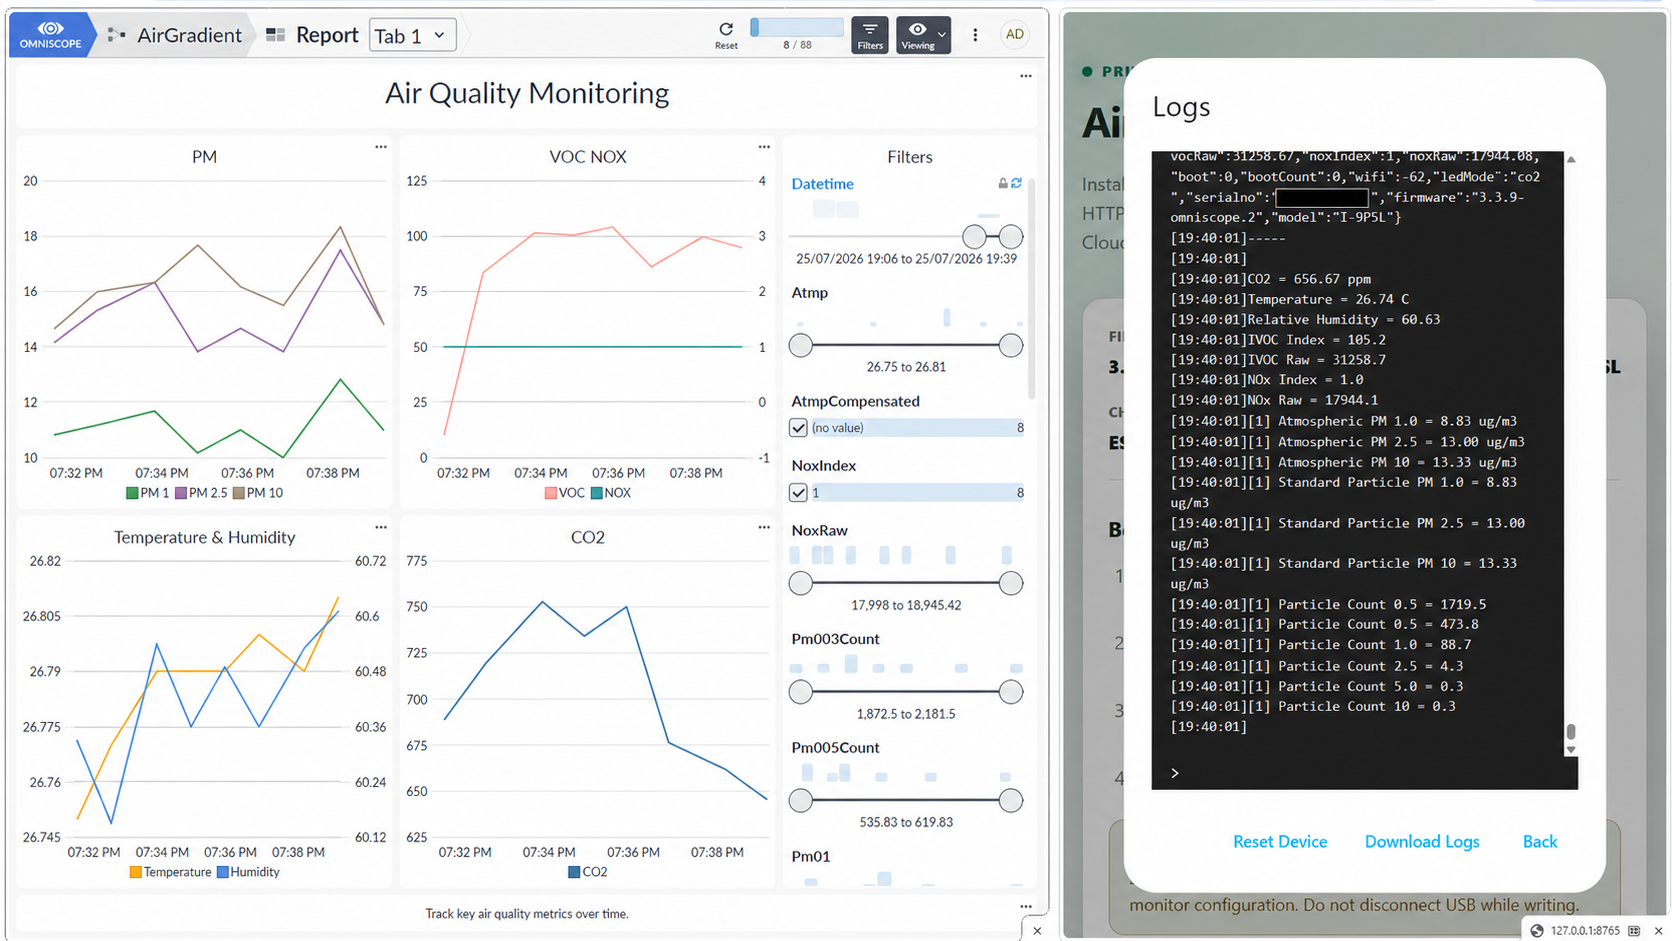
The same live stream seen at both ends: measurements in the Omniscope report and the device log. The monitor serial number is covered by an opaque redaction.
The workflow can write to a file or another durable source appropriate to the deployment. It should also use a device serial number and UTC timestamp, or an equivalent server-side key, if duplicate protection is required.
The first version crashed
The first build compiled successfully. It flashed successfully. The monitor started normally.
Then the first HTTPS request ran and the hardware rebooted.
The serial output eventually showed the cause:
Stack overflow
The original networking task had a 4096-byte stack. Establishing TLS and constructing the request needed more working memory than that.
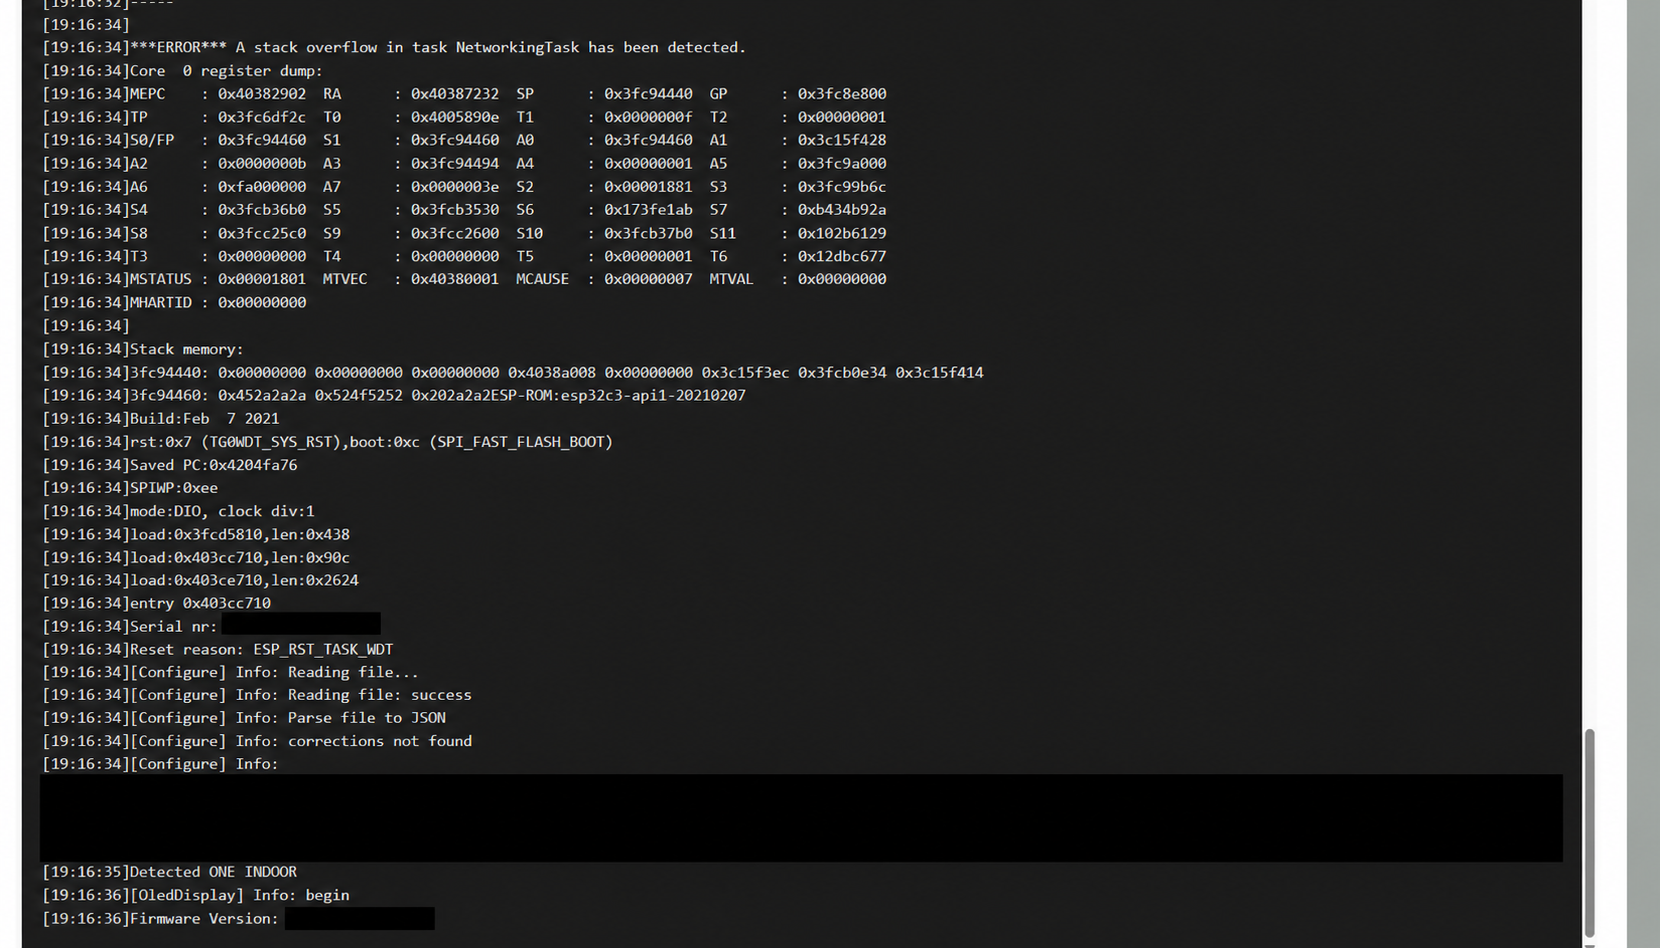
The first TLS attempt failed with a stack overflow. The device serial number, private configuration object and obsolete firmware version have been blacked out.
Version .2 increases the networking-task stack to 12288 bytes. After that
change, the request completed and the serial log reported:
Omniscope: submitting workflow (...-byte request)
Omniscope: workflow submitted (HTTP 2xx)
The workflow executed and a new point appeared in the report.
This was the least abstract and most satisfying test of the architecture.
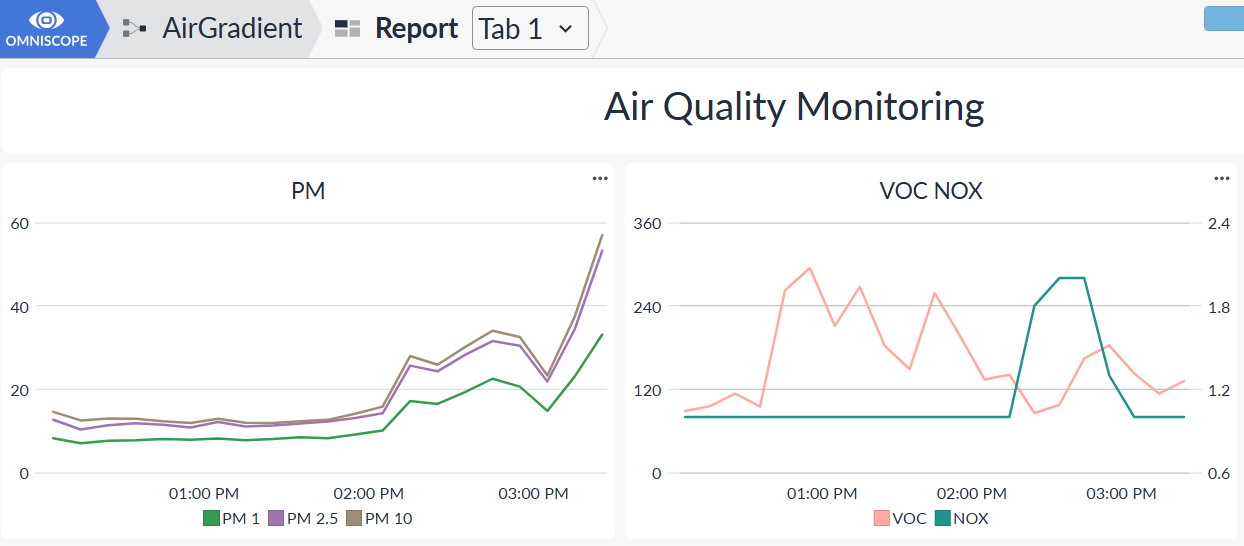
The practical success condition: the workflow has accepted the requests and the incoming PM, VOC and NOₓ observations are visible in the report.
Failure behaviour
I intentionally left out a device-side persistent queue. If Wi-Fi or Omniscope is unavailable, that minute is not added to the history; the next scheduled submission tries the next current measurement. This avoids repeated writes to flash, queue corruption or migration logic, ambiguous replay order and a flood of old measurements after a long outage. I also did not want to hide a miniature message broker inside the monitor.
For my use case, visible gaps are acceptable and should be monitored server-side. A deployment requiring complete delivery would need a more substantial buffering and deduplication design.
Installing it
The firmware repository includes a browser-based ESP Web Tools installer.
Using desktop Chrome, Edge or another compatible Chromium browser:
- Open the AirGradient Omniscope installer.
- Unplug the monitor.
- Hold the recessed BOOT button.
- Connect USB while continuing to hold BOOT, then release it.
- Choose Connect and install firmware.
- Select USB JTAG / Serial Debug.
- Leave Erase device unchecked if Wi-Fi and existing configuration should be preserved.
- Install the firmware.
- Disconnect USB for approximately three seconds and reconnect normally.
The page can also restore stock firmware.
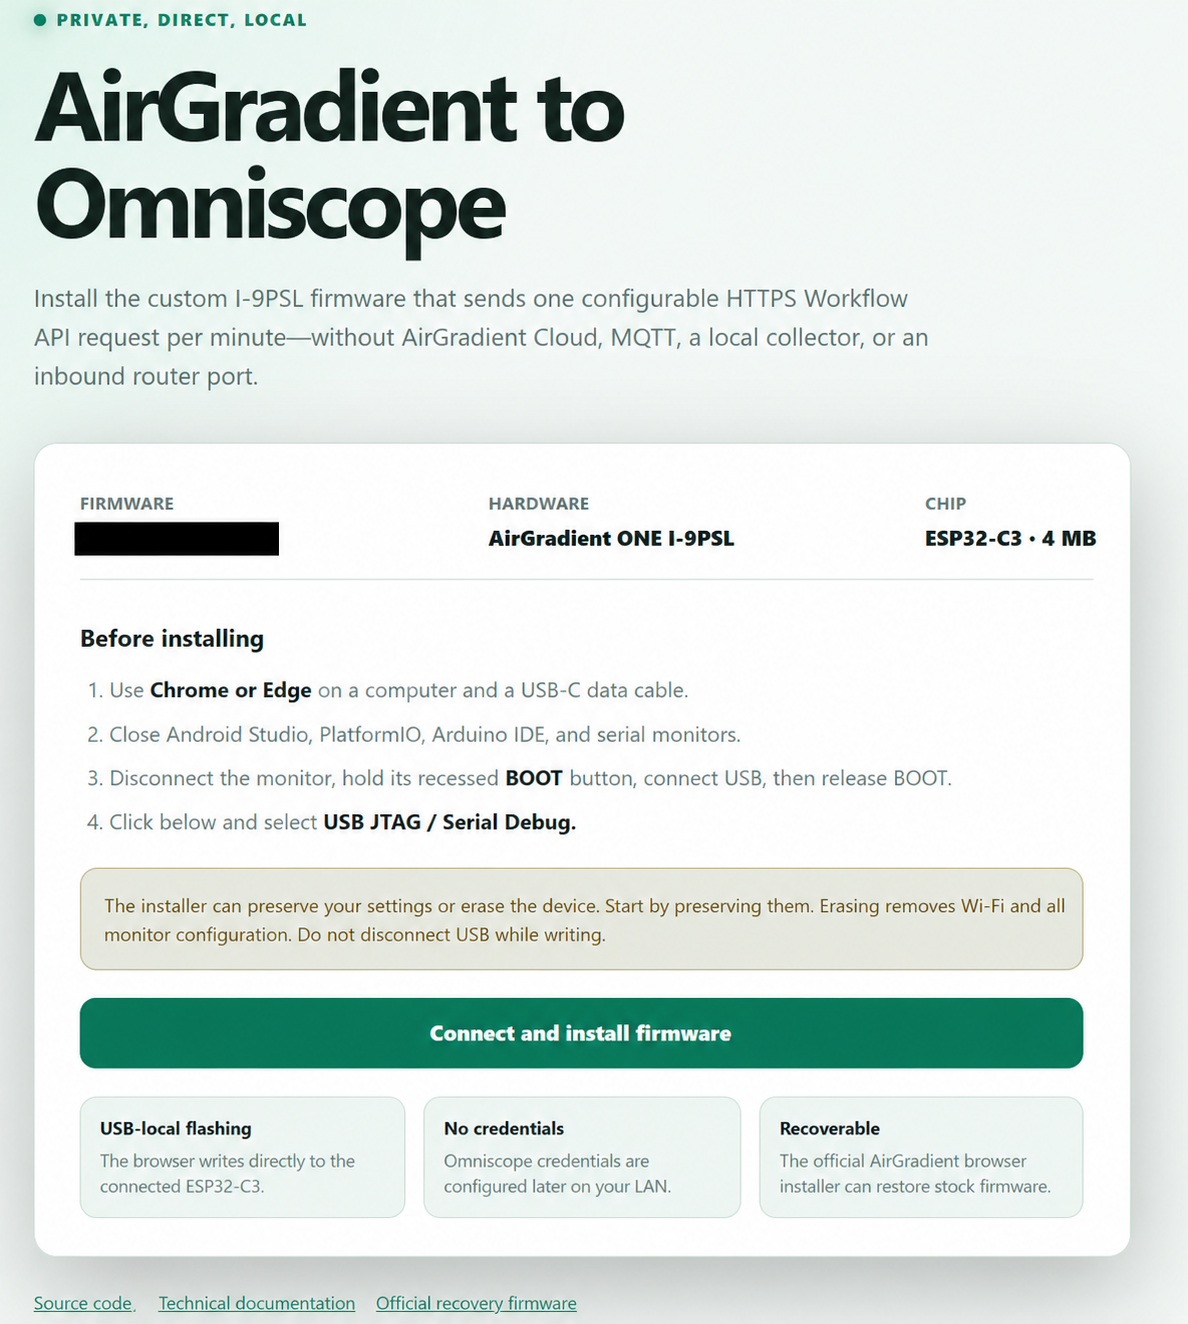
The Chrome/Edge USB installer. This earlier screenshot shows the final interface, but its obsolete pre-fix version number is deliberately hidden.
The companion Android APK is available from the Android download page.
Custom firmware always carries risk. Keep a recovery route, preserve upstream licensing and attribution, and understand the implications for warranty and support before flashing.
Building from source
The firmware uses PlatformIO:
platformio run -e esp32-c3
The application binary is produced at:
.pio/build/esp32-c3/firmware.bin
The Android application uses JDK 17, Android SDK 36, Android Gradle Plugin 8.13.2 and Gradle 8.13.
From the Android project:
./gradlew assembleDebug
or on Windows:
gradlew.bat assembleDebug
The debug APK is written to:
app/build/outputs/apk/debug/app-debug.apk
Use your own signing key for a production release.
What this architecture demonstrates
Running the complete system on one monitor made the consequences of each choice concrete.
Local control and remote analytics are compatible
I use the app only while it is on the same LAN as the monitor. Historical collection does not depend on the phone: the device makes one outbound request to the configured server, with no inbound access to the home network.
Configuration belongs at the edge
I made the endpoint, workflow block and parameter name configurable because those server details can change. A routine project move or rename should not require another firmware release within the existing certificate trust boundary.
A workflow can be an operational API
The Omniscope workflow receives the request, parses it, timestamps it, transforms it, appends it to history and feeds the report. The same workflow is the operational API and the visible data process.
Removing middleware can improve clarity
For this one-monitor project, direct workflow execution removed the MQTT broker and receiver service I would otherwise have had to configure and maintain. It also reduced the number of credentials, ports, processes and failure points.
Minimal systems still require real security decisions
Even with a “fleet” of one, I still had to deal with the WebView trust boundary, local-address validation, password masking, least-privilege credentials and certificate validation.
Could another monitor use the same pattern?
Yes, provided it has:
- accessible current measurements;
- open or extensible firmware;
- network connectivity;
- enough memory for TLS;
- support for outbound HTTPS;
- a safe configuration mechanism.
The JSON schema can be different because the workflow parameter, parsing logic and report can adapt to the device. The same arrangement could support a school, office, community building or distributed citizen-science deployment, provided its operators understand and control where the data goes.
I would not present a personal sensor as a substitute for a regulatory monitoring station. Calibration, placement, maintenance and interpretation still matter. An open monitor can nevertheless support education, complement official data and help a community ask more precise questions.
Source and documentation
The complete implementation is public:
- Firmware, installer and Workflow API documentation
- Android controller and APK
- Official AirGradient firmware 3.3.9
- AirGradient local-server API
- Omniscope Workflow REST API
- Omniscope live API explorer
When the first point appeared in the Omniscope report, the architecture stopped being a diagram. The monitor was reading its sensors, using configuration I could inspect and adding its own measurement to history without an intermediary cloud.
No mystery cloud in the middle, and just enough firmware debugging to make it fun.